When preparing for the Pinewood Derby one of the most critical factors in car performance is how to best weight the car. The two critical factors here are how much weight to add and where to place it.
For optimal Pinewood Derby car performance, most of the weight should be placed one inch in front of the rear axle and as low on the body as possible. This weight positioning helps create maximum inertia to push the car faster once the vertical drop has stopped and the horizontal track is reached.
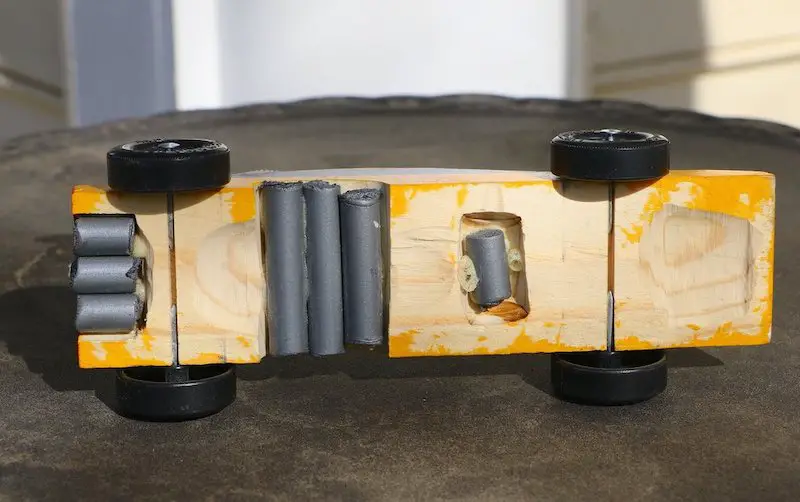
This is what optimal weight looks like in derby car using ¼” square tungsten weights (1/6th oz. each), from a top-down view, side view and angled view.
Specific Weight Placement
The two most common questions about specific Pinewood Derby car weight placement are 1.) Top or bottom? And 2.) Back or front? I answered those questions above in general terms. Now here are the specifics to help you perfect your design.
Most people tend to lean towards the extremes thinking that the only way to be the fastest is to push your advantage as much as possible. While this is true, most people do not realize that more of something does not automatically make it better. I will explain…
Weight Top or Bottom?
I have heard arguments for getting the weight as high on the car body as possible because it will then have further to fall. At first, this kind of makes sense. In fact, it would make perfect sense if you were going straight down. But you are not. Your derby car is on an angled ramp – also known as an incline plane. As your car drops lower, it also moves further out along the track.
In other words, you are not trying to push your car down, you are trying to push it forward while taking advantage of gravity that tends to pull things down. It sounds similar but there is a big difference. To push your car forward while still taking advantage of gravity, you will want your weights as near the bottom of the car’s body as possible.
Weight Back or Front? Now you want your weight near the top. But NOT The top of the car – the top of the track. Since your car is pointing downward, this means having the weight placement toward the rear of the car.
Notice that I said, “toward the rear of the car” and not “at the rear of the car.” This is because if your weight is all the way at the back the car will pop a wheelie as it runs down the track and likely either get hung up on the rail or fly off the track or at the very least fishtail when on the horizontal section of the track.
Optimal weight placement , for our needs, means having the bulk the weight centered one inch in front of the rear axle. This makes your balance point about 3/4’” before the rear axle, which is ideal for both speed and stability in most derby car designs.
Notice that I said “the bulk of the weight.” You still want some of the added weight behind the rear axle to maximize the push factor (see the red arrow below).
The wedge car above is designed for a combination of speed and stability. Once you have some experience setting up your wheels (canting, shaving, etc.) and know the type of track you will run on (wooden versus aluminum, 36′ versus 45′, etc.) you should start experimenting with placing more weight behind the rear axle. This will increase your speed.
IMPORTANT: The speed in derby cars come from the momentum of forward motion generated when the car goes down the track. This translates to inertia. When the front of the car reaches the transition point between the extreme slope and horizontal flat track, having the weight in the rear means the weight is still falling (IE/ pushing the car forward.) This makes the car faster but less stable – especially on wooden tracks where seams are often like miniature speedbumps.
We can get really complicated here and discuss Newton’s First Law of Motion. We’re talking about the physics guy – not the delicious fig cookie.
Here it is in case you want the science stuff…
Newton’s First Law of Motion: “An object at rest stays at rest and an object in motion stays in motion with the same speed and in the same direction unless acted upon by an unbalanced force.”
An easy way to think of it is like this… An object in motion tends to stay in motion. This means the longer you can have the car being pushed forward by the weight falling with gravity – the longer it will stay in motion.
Think of that bit of weight behind the rear axle as your high octane reserve fuel. Once the main fuel source is exhausted (the weight reaches the flat of the track) your reserve kicks in with that little extra oomph.
Center of Mass and Balance
There’s no need to do a bunch of math here unless you really enjoy it. In my experience, having the car’s balance point about ¾” in front of the back axle will maximize speed and stability for the race.
If you want to see how close you can get your car, find its balance point by laying it over a ruler standing on edge. If you happen to have a wedge with a wider base, that makes it even easier.
As you can see, the balance point (triangle) on the car example below is closer to 13/16” than 3/4” but it works well for the design and provides a very stable ride. Again, the ideal balance point is typically about ¾” in front of the rear axle. You should test to see what gives you the fastest car with the smoothest ride.
How to Place the Weight?
Because you want the weight at the bottom of the car’s body, it is a good idea to drill in from the sides or bottom. Either way works well. I personally like to drill from the bottom and glue the weights securely in place so I have more options in exactly where each bit of weight is placed.
If you want to eek out every last bit of aerodynamic advantage, fill in the remaining holes and indentations with wood putty. This will keep the air circulating without interference beneath the car.
Pro Tip: If putty will add too much weight to your derby car, or mess up your careful weight distribution – run a length of 1-3/4″ wide tape along the bottom of the car to make a smooth underside canopy. Just trim a piece of 2″ wide tape. Today you can get tape in hundreds of patterns from camouflage to SpongeBob – or just stick to solid colors. It will look like high-gloss paint.
You can also trim and glue a regular playing card into place. Both methods work great!
Just make sure your race allows you to cover up the grooved axles. Some races require these to be visible and the nails within visible.
Supporting Weight (Relieving Stress on the Axles)
Once you have placed the wheels and axles on your weighted car, it is best to take the weight off the axles by letting the car body sit on a narrow block of some kind. Now there is no weight at all on the wheels or axles until the next time you run your car. This helps prevent any minor shifts your car might otherwise experience.
Here is our wedge Pinewood Derby car sitting on a six-inch-long block of two-by-two wood. Keep in mind that finished 2” x 2” wood is actually 1.5” x 1.5” so it fits just right. A small piece of two-by-four works great.
Supporting Structural Weight
Sometimes you might need to add a little support to a stack of weights if you drilled a little too deep into the derby car body. There’s an easy fix for that…
Pro Tip: If you want to conceal your weights by drilling cavities and putting the weights there and don’t want to drill in from the bottom for some reason – that is fine. You can drill from the top and leave about one-eight of an inch of wood at the bottom of the hole to support the weight.
If you drill too close to the bottom or sand away too much of the bottom of the car, do not worry. You can double the strength of the remaining wood by adding simple white carpenter’s glue.
Here is how to reinforce thin wood with glue…
- Sand the surfaces to be somewhat smooth without removing too much material (surfaces = the bottom of the cavity and the bottom of the car).
- Brush or blow away as much dust as you can.
- Dampen a lint-free cloth just enough so it will get the surface of the wood moist without soaking it.
- Lightly apply the damp cloth the surfaces you just cleaned. Wood glue needs moisture to properly cure. This little trick will help draw the glue into the pores of the wood and make it much stronger than the wood alone.
- Give it about two to three minutes for the moisture to seep into the car body. It is only seeping in a tiny amount so it will not take long. This is especially true if you baked your wooden block to remove excess moisture. The outside surfaces of the wood essentially become a sponge after that.
- Now apply a thin layer of white carpenter’s glue onto the entire bottom of the car and the inside bottom of the hole.
- After about 30 minutes hold your car to a light and look at the bottom surface from an angle. It will look shiny where the glue has dried on the surface and dull where it has fully soaked into the wood.
- Use you best judgement to decide if you want to add another thin layer of glue (but NO more water). It is doubtful much more will soak into the wood, but it can help to even out the surface and maximize the amount of reinforcement.
What to Use for Pinewood Derby Weights
The type of material you use as weights will also help determine its optimal placement. This is because the denser and heavier the weight, the more you can pinpoint its placement. And the more accurately you can position the weight on the car, the better the car will perform.
If you want to dial in your weight as precisely as possible, tungsten is the best material to use. But it is a bit pricey, averaging about $5.50 to $7 per ounce of cylinder weight and a whopping $13 per ounce for small cube weights!
Pro Tip: Consider buying an ounce of tungsten putty to add the final tweaks to your car weight distribution. It’s about $8 per ounce but can is like Silly Putty and cab go to whatever pinpoint location you need.
Lead is a nice alternative to tungsten and far less expensive. However, lead is a poisonous substance and might not be allowed in some geographical areas where competitions take place (at least when using exposed lead attached to the surface of the car). It all comes down to local derby and state rules.
Final Thoughts on Pinewood Derby Car Weight Placement
It is important to experiment with different weight placement to best match the body type you use on your car. A typical Pinewood Derby Car block is 7” long by 1.75” wide by 1.25” tall and weighs 3.4 ounces out of the box. In my simple wedge design, I had only 1.32 ounces of wood weight after cutting the wedge and milling out the space for tungsten weight cubes. Due to the shape of body, most of the wood weight was toward the rear.
The wheels and axles balance that a bit but the rest I had to do by carefully placing the weights – but you don’t have to use tungsten to do it.
You can check the youtube video below-
If you want to see what other, less expensive weights work well, check out another post on this site called Weights for Pinewood Derby Cars. You can even weight your entire car for just $0.30 with the tips in this article: Pinewood Derby Weights for Pennies an Ounce!
Last update on 2023-10-26 / Affiliate links / Images from Amazon Product Advertising API